
Preface#
This is a continuation of the Git content that wasn’t fully shown in the previous post—the real Git begins here. Let’s keep going.
Git Branch Management#
What are branches for in practice? Suppose you’re going to develop a new feature that takes two weeks. In the first week you finish 50% of the code. If you commit immediately, because the code is incomplete, other people may be blocked by an unfinished codebase. If you wait until everything is done and commit once at the end, you risk losing daily progress.
With branches, you don’t have to worry. You create your own branch; others won’t see it and can keep working normally on the original branch. You work on your own branch and commit whenever you want. When the feature is finished, merge back into the original branch in one shot—safe, and doesn’t interrupt others.
Git branches are special: creating, switching, and deleting branches can all be done within 1 second—whether your repository has 1 file or 10,000 files.
Create and Merge Branches#
Let’s do it for real. First, create a dev branch and switch to it:
$ git checkout -b dev   # create and switch branch
Switched to a new branch 'dev'
Adding -b to git checkout means “create and switch”, equivalent to these two commands:
$ git branch dev
$ git checkout dev
Switched to branch 'dev'
Then use git branch to see the current branch:
$ git branch  # list branches
* dev
mastergit branch lists all branches. The current branch has a * marker. Now we can commit normally on dev. For example, modify readme.txt and add a line, then commit:
$ git add readme.txt
$ git commit -m "branch test"
[dev b17d20e] branch test
 1 file changed, 1 insertion(+)
Now the work on dev is done, so switch back to master:
$ git checkout master   # switch branch
Switched to branch 'master'
After switching back to master, if you open readme.txt, the line you just added is gone! Because the commit happened on dev, and master’s commit pointer hasn’t moved.
Now merge dev back into master with git merge:
$ git merge dev   # merge branch
Updating d46f35e..b17d20e
Fast-forward
 readme.txt | 1 +
 1 file changed, 1 insertion(+)
git merge merges the specified branch into the current branch. After merging, readme.txt matches the latest commit on dev. Notice the “Fast-forward” message: Git tells you this merge is in fast-forward mode, i.e. it simply moves master to point at dev’s current commit, so it’s very fast. Of course not every merge can be fast-forward; we’ll discuss other merge modes later. After merging, you can safely delete the dev branch:
$ git branch -d dev   # delete branch
Deleted branch dev (was b17d20e).
After deletion, git branch shows only master.
switch#
Notice that switching branches uses git checkout <branch>, while discarding changes uses git checkout -- <file>. Same command, two meanings—confusing. In practice, “switch branch” is better expressed as switch. So newer versions of Git provide git switch.
To create and switch to a new dev branch:
$ git switch -c dev
To switch to an existing master branch:
$ git switch master
Using git switch is easier to understand than git checkout.
Resolve Conflicts#
As the saying goes, things don’t always go smoothly. Merging branches is often not effortless. Let’s walk through a real conflict.
First, create a new feature1 branch and continue developing your new feature:
$ git switch -c feature1
Switched to a new branch 'feature1'
Then modify a file—for example, change the last line of readme.txt to: Creating a new branch is quick AND simple.
Commit on feature1:
$ git add readme.txt

$ git commit -m "AND simple"
[feature1 14096d0] AND simple
 1 file changed, 1 insertion(+), 1 deletion(-)
Switch to master:
$ git switch master
Switched to branch 'master'
Your branch is ahead of 'origin/master' by 1 commit.
	(use "git push" to publish your local commits)
From the output you can see Git will also tell you that your local master is 1 commit ahead of origin/master. Don’t panic—this isn’t an error or conflict.
Now consider this new situation: on master, change the last line of readme.txt to Creating a new branch is quick & simple. and commit. What happens?
$ git add readme.txt    # commit on master
$ git commit -m "& simple"
[master 5dc6824] & simple
 1 file changed, 1 insertion(+), 1 deletion(-)
Answer: now master and feature1 each has its own new commit, like this:
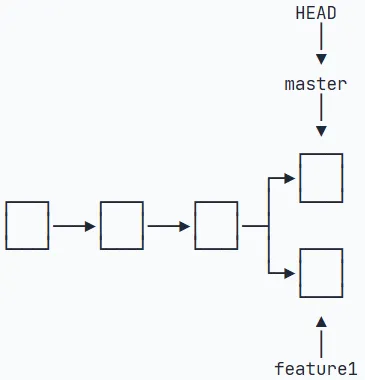
In this case Git cannot use the “fast-forward merge” for git merge. It must try to merge the changes, which may result in a conflict. Let’s try:
$ git merge feature1
Auto-merging readme.txt
CONFLICT (content): Merge conflict in readme.txt
Automatic merge failed; fix conflicts and then commit the result.
As expected, there’s a conflict. Git tells us readme.txt has a conflict and we must resolve it manually before committing. git status also shows the conflicting file:
$ git status
On branch master
Your branch is ahead of 'origin/master' by 2 commits.
	(use "git push" to publish your local commits)

You have unmerged paths.
	(fix conflicts and run "git commit")
	(use "git merge --abort" to abort the merge)

Unmerged paths:
	(use "git add <file>..." to mark resolution)

	both modified:   readme.txt

no changes added to commit (use "git add" and/or "git commit -a")
Open the conflicted readme.txt in VS Code. You’ll see Git’s conflict markers. Here is what it looks like:
Git is a distributed version control system.
Git is free software distributed under the GPL.
Git has a mutable index called stage.
Git tracks changes of files.
<<<<<<< HEAD
Creating a new branch is quick & simple.
=======
Creating a new branch is quick AND simple.
>>>>>>> feature1
Git uses <<<<<<<, =======, >>>>>>> to mark content from different branches. Choose what you need for your project, edit accordingly, and save the file. Then commit again:
$ git add readme.txt
$ git commit -m "conflict fixed"
[master cf810e4] conflict fixedNow master and feature1 look like:
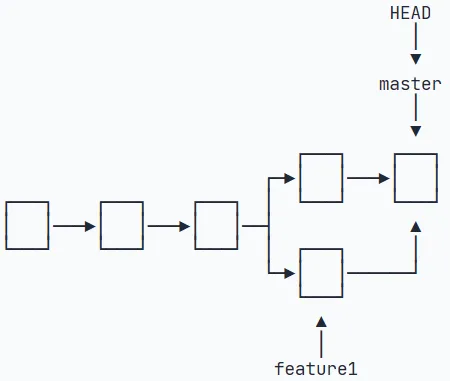
You can also use git log with options to see branch merges, or git log --graph to see a merge graph:
$ git log --graph --pretty=oneline --abbrev-commit
*   cf810e4 (HEAD -> master) conflict fixed
|\
| * 14096d0 (feature1) AND simple
* | 5dc6824 & simple
|/
* b17d20e branch test
* d46f35e (origin/master) remove test.txt
* b84166e add test.txt
* 519219b git tracks changes
* e43a48b understand how stage works
* 1094adb append GPL
* e475afc add distributed
* eaadf4e wrote a readme fileFinally, when you’re done with the branch, delete feature1:
$ git branch -d feature1
Deleted branch feature1 (was 14096d0).Branch Management Strategy#
Usually, when merging branches, Git will use Fast forward if possible. But in this mode, after deleting the branch, the branch information is lost. If you want to force-disable Fast forward, Git will create a new commit during merge, so the branch history remains visible. Let’s practice merging with --no-ff.
First, create and switch to dev again:
$ git switch -c dev
Switched to a new branch 'dev'Modify readme.txt and commit a new commit:
$ git add readme.txt
$ git commit -m "add merge"
[dev f52c633] add merge
1 file changed, 1 insertion(+)Now switch back to master:
$ git switch master
Switched to branch 'master'Prepare to merge dev. Note the --no-ff parameter: it disables Fast forward. Because this merge will create a new commit, add -m to write the commit message:
$ git merge --no-ff -m "merge with no-ff" dev
Merge made by the 'recursive' strategy.
 readme.txt | 1 +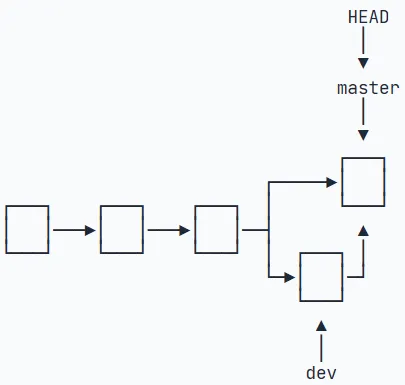
1 file changed, 1 insertion(+)After merging, check branch history with git log:
$ git log --graph --pretty=oneline --abbrev-commit
*   e1e9c68 (HEAD -> master) merge with no-ff
|\
| * f52c633 (dev) add merge
|/
*   cf810e4 conflict fixed
...You can see that without fast-forward, the merge looks like this:
Branch Strategy#
In real development, we should manage branches with some basic principles:
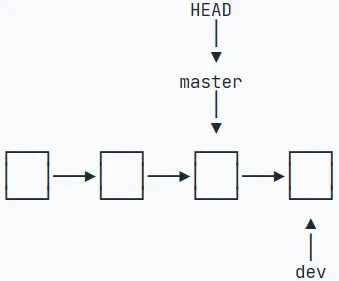
First, the master branch should be very stable. It’s used only for releasing new versions; don’t do day-to-day work on it. Where do you work then? On the dev branch. The dev branch is unstable. At some point—e.g. when releasing version 1.0—you merge dev into master, and release 1.0 from master.
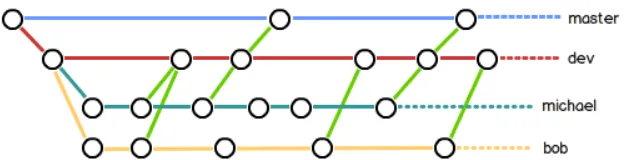
You and your teammates all work on dev. Each person has their own feature branches, and merges into dev from time to time. So a typical team branch structure looks like:
Bug Branch#
Let’s introduce a scenario: while you’re developing on dev, suddenly you’re assigned a bug-fix task. But your dev work is only half done and can’t be committed yet. The project owner needs you to fix the bug now—what do you do?
Fortunately Git provides stash, which can “stash away” your current working state so you can come back later:
$ git stash
Saved working directory and index state WIP on dev: f52c633 add mergeNow git status shows a clean working tree (unless there are untracked files), so you can safely create a branch to fix the bug.
First decide which branch to fix the bug on. Suppose we need to fix it on master. Create a temporary branch from master:
$ git checkout master
Switched to branch 'master'
Your branch is ahead of 'origin/master' by 6 commits.
	(use "git push" to publish your local commits)

$ git checkout -b issue-101
Switched to a new branch 'issue-101'Fix the bug, then commit:
$ git add readme.txt
$ git commit -m "fix bug 101"
[issue-101 4c805e2] fix bug 101
1 file changed, 1 insertion(+), 1 deletion(-)After the fix, switch back to master, merge, and delete the issue-101 branch:
$ git switch master
Switched to branch 'master'
Your branch is ahead of 'origin/master' by 6 commits.
	(use "git push" to publish your local commits)

$ git merge --no-ff -m "merged bug fix 101" issue-101
Merge made by the 'recursive' strategy.
 readme.txt | 2 +-
1 file changed, 1 insertion(+), 1 deletion(-)Great—the bug is fixed. Now it’s time to go back to work on dev. Switch to dev, then check status. You’ll see the working tree is clean. Where did your previous work go? Check git stash list:
$ git stash list
stash@{0}: WIP on dev: f52c633 add mergeThe work is still there. Git stored the stash somewhere, but you need to restore it. There are two ways:
- Use
git stash applyto restore, but it does not remove the stash; you needgit stash dropto delete it. - Use
git stash popto restore and delete the stash in one go.
$ git stash pop
On branch dev
Changes to be committed:
	(use "git reset HEAD <file>..." to unstage)

	new file:   hello.py

Changes not staged for commit:
	(use "git add <file>..." to update what will be committed)
	(use "git checkout -- <file>..." to discard changes in working directory)

	modified:   readme.txt

Dropped refs/stash@{0} (5d677e2ee266f39ea296182fb2354265b91b3b2a)Now if you run git stash list again, there will be no stashes. If needed, you can stash multiple times. When restoring, list stashes first and restore a specific one:
$ git stash apply stash@{0}After fixing the bug on master, think about this: dev was branched off from master earlier, so the same bug likely exists on dev too. How do you fix the bug on dev? The obvious way is to repeat the fix and commit again. Is there an easier way?
To fix the same bug on dev, we only need to “copy” the change from the commit 4c805e2 fix bug 101 onto dev. Note: we only want the changes from that commit, not a full merge of the master branch.
For convenience Git provides cherry-pick, which copies a specific commit onto the current branch:
$ git branch
* dev
	master
$ git cherry-pick 4c805e2
[master 1d4b803] fix bug 101
1 file changed, 1 insertion(+), 1 deletion(-)Git created a new commit on dev. Note the new commit id is 1d4b803, which differs from master’s 4c805e2. The changes are the same, but they are different commits. With git cherry-pick, you don’t need to manually repeat the bug-fix steps on dev.
Since we can fix on master then replay on dev, can we fix on dev first and replay on master? Sure—but you still need git stash to save your working state so you can switch branches.
Feature Branch#
The workflow and principle are similar to bug branches, so I won’t go into details here. I’ll add more if needed later.
Collaboration#
When you clone a remote repository, Git automatically links your local master to the remote master, and the default remote name is origin. To view remote info, use git remote, or git remote -v for more details. It will show the fetch/push URLs. If you don’t have push permissions, you won’t see the push URL.
Pushing a branch is simple. When pushing, specify the local branch; Git will push it to the corresponding remote branch:
$ git push origin master   # push to master
$ git push origin dev # push to devBut you don’t necessarily need to push every local branch. So which branches should be pushed?
masteris the main branch, so it should always be synchronized with the remote.devis the development branch; all team members work on it, so it should be synchronized too.- Bug-fix branches used only locally don’t need to be pushed.
- Whether feature branches need to be pushed depends on whether you collaborate with teammates on them.
In short: in Git, branches can be kept locally for your own use. Whether to push is up to you.
If your teammate has pushed commits to origin/dev, and you happened to modify the same file and try to push (meaning the remote version differs from your local version because you both changed the same file and they pushed first), you may get this:
$ git push origin dev
To github.com:michaelliao/learngit.git
 ! [rejected]        dev -> dev (non-fast-forward)
error: failed to push some refs to 'git@github.com:michaelliao/learngit.git'
hint: Updates were rejected because the tip of your current branch is behind
hint: its remote counterpart. Integrate the remote changes (e.g.
hint: 'git pull ...') before pushing again.
hint: See the 'Note about fast-forwards' in 'git push --help' for details.Push failed because your teammate’s latest commit conflicts with what you’re trying to push. The solution is simple: as Git suggests, pull the latest commits from origin/dev, merge locally, resolve conflicts, then push:
$ git pull
There is no tracking information for the current branch.
Please specify which branch you want to merge with.
See git-pull(1) for details.

		git pull <remote> <branch>

If you wish to set tracking information for this branch you can do so with:

git branch --set-upstream-to=origin/<branch> devgit pull also failed, because the local dev branch isn’t linked to origin/dev. Follow the hint to set the upstream tracking:
$ git branch --set-upstream-to=origin/dev dev
Branch 'dev' set up to track remote branch 'dev' from 'origin'.Pull again:
$ git pull
Auto-merging env.txt
CONFLICT (add/add): Merge conflict in env.txt
Automatic merge failed; fix conflicts and then commit the result.This time git pull succeeded, but there are merge conflicts that must be resolved manually—exactly the same as the conflict resolution shown earlier. After resolving, commit, then push:
$ git commit -m "fix env conflict"
[dev 57c53ab] fix env conflict

$ git push origin dev
Counting objects: 6, done.
Delta compression using up to 4 threads.
Compressing objects: 100% (4/4), done.
Writing objects: 100% (6/6), 621 bytes | 621.00 KiB/s, done.
Total 6 (delta 0), reused 0 (delta 0)
To github.com:michaelliao/learngit.git
7a5e5dd..57c53ab dev -> devSo the usual collaboration workflow is:
- First, try
git push origin <branch-name>. - If push fails, the remote branch is newer—use
git pullto merge. - If there are conflicts, resolve them and commit locally.
- After there are no conflicts (or after resolving them), push again.
- If
git pullsaysno tracking information, it means the local branch isn’t linked to the remote branch. Usegit branch --set-upstream-to <branch-name> origin/<branch-name>.
Once you’re familiar with it, collaboration becomes very simple.
Rebase#
Honestly I don’t fully understand this yet. A foreseeable scenario: after coding, you check the website and notice the README isn’t good, so you edit it directly on the web. Now local and remote are out of sync. Before your next local commit, you merge and then push, and your commit history gains an extra merge commit—which looks ugly.
Sometimes you commit code, then immediately discover a bug; patching here and there results in many commits. The history looks messy and is hard to read, like this:
$ git log --graph --pretty=oneline --abbrev-commit
* d1be385 (HEAD -> master, origin/master) init hello
*   e5e69f1 Merge branch 'dev'
|\
| *   57c53ab (origin/dev, dev) fix env conflict
| |\
| | * 7a5e5dd add env
| * | 7bd91f1 add new env
| |/
* |   12a631b merged bug fix 101
|\ \
| * | 4c805e2 fix bug 101
|/ /
* |   e1e9c68 merge with no-ff
|\ \
| |/
| * f52c633 add merge
|/
* cf810e4 conflict fixedWhen things look messy like this, rebase becomes useful. Try git rebase:
$ git rebase
First, rewinding head to replay your work on top of it...
Applying: add comment
Using index info to reconstruct a base tree...
M	hello.py
Falling back to patching base and 3-way merge...
Auto-merging hello.py
Applying: add author
Using index info to reconstruct a base tree...
M	hello.py
Falling back to patching base and 3-way merge...
Auto-merging hello.pyIt prints a bunch of operations—what’s the effect? Check git log again:
$ git log --graph --pretty=oneline --abbrev-commit
* 7e61ed4 (HEAD -> master) add author
* 3611cfe add comment
* f005ed4 (origin/master) set exit=1
* d1be385 init hello
...The previously diverged history is now a straight line. How does that work? The idea is simple: Git “moves” your local commits to be on top of another base—here, after f005ed4 (origin/master) set exit=1—so the whole history becomes linear.
Before and after rebase, the final content is the same, but your local commits are rewritten: they are no longer based on d1be385 init hello, but on f005ed4 (origin/master) set exit=1. The final commit 7e61ed4 content remains consistent. That’s the key feature of rebase: it “tidies up” a diverged history into a straight line, making it easier to read. The downside is that your local diverged commits have been rewritten.
Finally, push your local branch to the remote:
~/learngit michael$ git push origin master
Counting objects: 6, done.
Delta compression using up to 4 threads.
Compressing objects: 100% (5/5), done.
Writing objects: 100% (6/6), 576 bytes | 576.00 KiB/s, done.
Total 6 (delta 2), reused 0 (delta 0)
remote: Resolving deltas: 100% (2/2), completed with 1 local object.
To github.com:michaelliao/learngit.git
f005ed4..7e61ed4 master -> masterCheck git log again and you’ll see the remote branch history is also a straight line:
$ git log --graph --pretty=oneline --abbrev-commit
* 7e61ed4 (HEAD -> master, origin/master) add author
* 3611cfe add comment
* f005ed4 set exit=1
* d1be385 init hello
...Still not fully clear, so here’s a short summary:
- First, sync the latest remote code and start working…
- If
git pushhas conflicts, someone pushed their local changes before you. - Then you need to pull changes first. Use
git pull. It merges remote commits with your local commits. If there are conflicts, resolve and commit; this creates a merge record. git pull -- rebaseplaces your commits “after” the pulled remote commits (changes the base). If there are conflicts, resolve all conflicted files, thengit add <conflicted-file>.git rebase --continueto finish.
Afterword#
This post is long, because branching is the most significant feature that differentiates Git from other version control tools. So you and I—let’s review often and improve carefully.